
Solar Panel Roof Condition Requirements: What You Need First
Solar panel roof condition requirements protect your investment. Call 8333658755 to connect with trusted roofing and solar pros near you.

By Rachel Green
Learn more about Solar Panel Installation and Repair for guides, costs, and what to expect.
Compare Solar Panel Installation and Repair Pros Near You

Enter your ZIP code to compare top-rated local professionals and request free quotes.
A solar installation is only as reliable as the roof beneath it. Panels are designed to last 25 to 30 years, and once they are bolted down, the roof surface underneath becomes difficult and expensive to service. That is why every reputable installer evaluates your roof before quoting a system, and why understanding solar panel roof condition requirements early can save you thousands in avoidable repairs. Whether your roof is five years old or approaching the end of its service life, this guide explains exactly what inspectors look for, how to prepare, and when it makes sense to fix the roof before the panels go up.
Why Roof Condition Matters Before Solar Installation
Solar panels add weight, penetrate the roof surface at multiple points, and sit in place for decades. Each of those factors turns a minor roofing flaw into a serious liability. A small leak that would normally drip into an attic corner can be trapped under an array, slowly rotting decking and insulation while the homeowner has no idea anything is wrong. By the time the damage shows up inside the house, the panels must be removed, stored, and reinstalled, which multiplies the repair cost dramatically.
Roof condition also affects performance and warranty coverage. Panels need a flat, structurally sound plane to sit on so that mounting rails stay aligned and water drains correctly. If shingles are curling or flashing is loose, manufacturers may refuse to honor workmanship warranties because the underlying surface was not suitable. Most solar contracts include a clause stating the roof must be in good condition, so skipping the assessment does not remove the requirement, it simply shifts the risk onto you.
Finally, timing matters for your budget. If your roof has ten or more years of life left, installing solar now is efficient. If it has five years or less, you will likely pay for a full removal and reinstallation later, often costing $2,000 to $5,000 or more. Planning the roof replacement and the solar installation together eliminates that double expense and gives you a single, coordinated project timeline.
Core Solar Panel Roof Condition Requirements
While every installer uses slightly different checklists, the underlying requirements are consistent across the industry. Inspectors evaluate age, structure, surface integrity, drainage, and accessibility. These factors determine whether your roof is solar-ready or needs preliminary work.
Here are the primary conditions a professional assessment will verify:
- Remaining service life of at least 10 to 15 years: The roof should outlast a reasonable portion of the solar system's lifespan so panels do not need to come off prematurely.
- Sound structural framing: Rafters, trusses, and decking must be free of rot, sagging, or insect damage so they can support the added load of panels and mounting hardware.
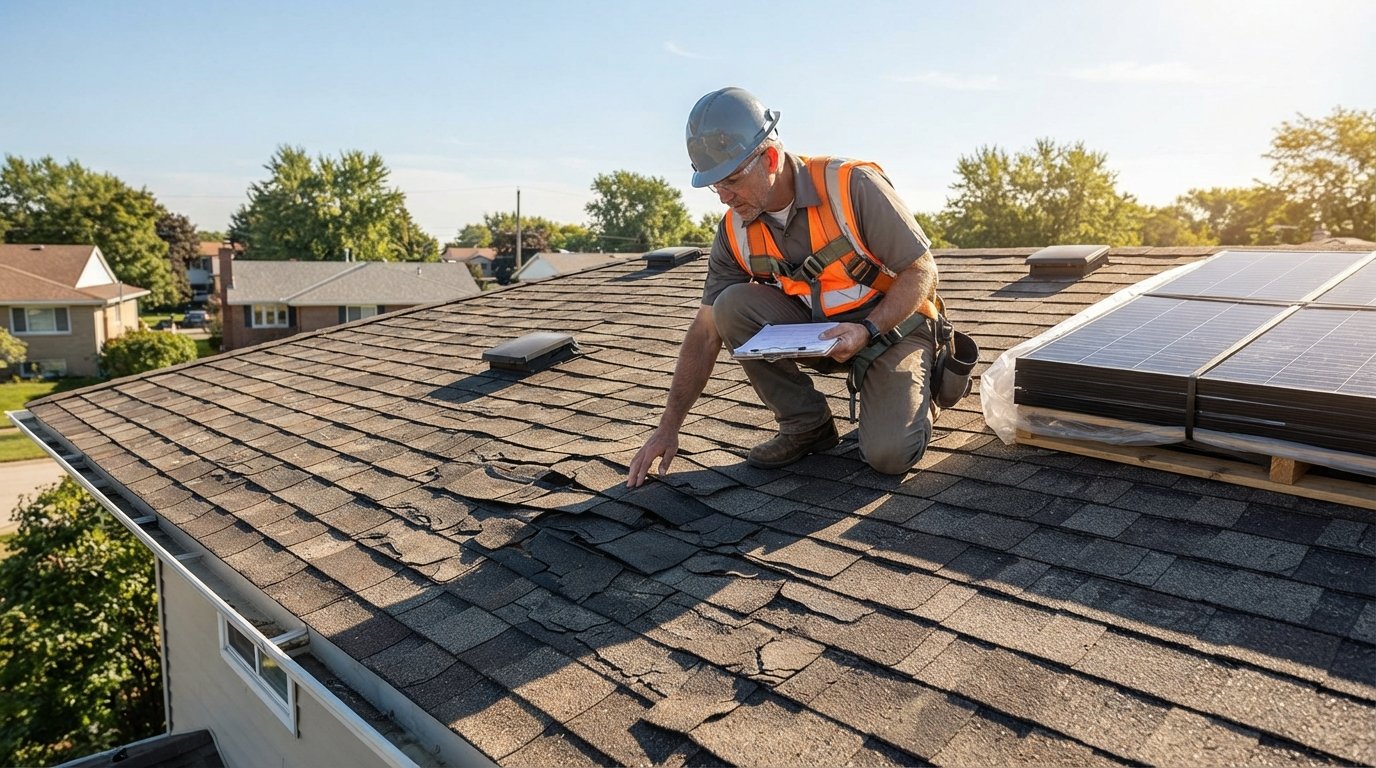
- Intact roofing surface: Shingles, tiles, or membrane should be free of cracks, curling, missing sections, or granule loss that signals advanced wear.
- Proper flashing and sealing points: All penetrations, including vents, chimneys, and skylights, must be watertight before new mounts are added.
- Adequate drainage and slope: Water must be able to flow off the roof without pooling around mounting feet or behind the array.
Beyond these basics, inspectors also look at the condition of the attic. Moisture stains, daylight visible through the roof boards, or a history of ice dams are red flags that suggest hidden problems. A roof that passes a visual check from the ground can still fail a closer inspection once someone walks the surface and examines the underside.
Roof Age and Material Considerations
Age is the single most common disqualifier. Asphalt shingles typically last 20 to 25 years, so a roof that is already 18 years old leaves almost no margin. Metal roofs, clay tiles, and slate can last 50 years or more and are usually excellent candidates, though they require specialized mounting hardware that avoids cracking or denting the surface. Flat roofs need a different approach entirely, often using ballasted or adhered mounting systems rather than penetrative mounts.
Material also affects installation cost and complexity. Tile and slate require careful drilling and custom brackets, which adds labor. Standing seam metal roofs use clamp-on mounts that avoid penetrations altogether, which is a significant advantage for leak prevention. Knowing your material helps you ask the right questions and anticipate how the installer will attach the array.
Structural Integrity and Load Capacity
Solar panels and their mounting rails add roughly 2.5 to 4 pounds per square foot across the array. Most modern roofs are engineered to handle this without reinforcement, but older homes and roofs with prior damage may not be. An inspector will check for sagging rooflines, cracked rafters, and soft spots in the decking. If the structure is compromised, a structural engineer may need to evaluate it and recommend reinforcement before installation can proceed.
Load capacity is also a regional concern. Homes in areas with heavy snow accumulation need to account for the combined weight of panels and snowpack. In those cases, the array may need to be mounted higher off the roof or spaced differently to allow snow to shed safely. Addressing this during the design phase prevents dangerous overloading later.
The Professional Inspection Process
A solar site assessment is more thorough than a typical roofing estimate. The inspector arrives with the goal of confirming both solar viability and roof readiness, and the visit usually takes one to two hours. Understanding what happens during this visit helps you prepare and ask informed questions.
Most inspections follow a consistent sequence:
- Exterior roof walk: The inspector examines shingles, flashing, vents, and seams from the roof surface, noting any damage or wear.
- Attic and structural review: Framing, decking, insulation, and signs of moisture are checked from inside the house.
- Shade and orientation analysis: Trees, chimneys, and neighboring structures are assessed for their impact on production.
- Electrical panel check: The main service panel is evaluated for capacity and compatibility with the inverter and solar tie-in.
- Report and recommendation: You receive findings, photos, and a clear statement of whether the roof is ready, needs minor repairs, or requires replacement first.
After the inspection, you should receive a written summary. If the roof fails any requirement, the report should specify exactly what needs to be fixed and whether the work can be done by the solar installer or requires a licensed roofer. Getting this in writing protects you if disputes arise later about pre-existing conditions.
It is also smart to ask how the installer handles roof penetrations and whether they offer a workmanship warranty that covers leaks caused by the solar mounting. A strong warranty of 10 to 25 years on penetrations is a good sign that the company stands behind its flashing work.
When to Repair or Replace Your Roof Before Solar
The decision to repair, replace, or proceed comes down to remaining lifespan and the cost of future removal. A useful rule of thumb: if the roof will not outlast the solar panels, replace it now. Panels are expected to produce for 25 to 30 years, so a roof with less than 15 years left is a poor match.
Minor issues, such as a few cracked shingles, loose flashing, or a small patch of damaged decking, can usually be repaired for a few hundred dollars and then covered by the array. Major issues, such as widespread granule loss, multiple active leaks, or sagging framing, point toward replacement. In many cases, combining the roof replacement and solar installation into one project is the most economical path because the roofing crew is already on site and the solar mounts can be integrated directly into the new roof.
There is also a timing advantage. Roofing materials and labor costs tend to rise over time, and replacing a roof later means paying for panel removal, storage, and reinstallation on top of the roofing bill. Handling both projects together avoids that duplication and keeps your warranty coverage clean. If you want a deeper look at system sizing before you commit, this guide to choosing the right solar panel sizes explains how roof area and energy needs shape the final design.
Common Roof Problems That Block Solar Installation
Certain defects appear repeatedly during solar assessments and almost always require correction before installation. Knowing them in advance helps you spot issues during your own walkthrough and budget accordingly.
The most frequent blockers include:
- Active leaks or water stains: Any sign of moisture intrusion must be traced and repaired, since panels will hide the source.
- Curling, cracking, or missing shingles: These indicate the roof is near the end of its life and cannot support long-term mounting.
- Deteriorated flashing: Worn seals around chimneys and vents are a leading cause of leaks after installation.
- Soft or rotted decking: Mounting bolts need solid wood to grip; soft spots must be replaced.
- Excessive shading or debris buildup: Persistent shade from trees reduces output and may require trimming or redesign.
Each of these issues is fixable, but the cost and timeline vary widely. A single flashing repair might take an afternoon, while replacing rotted decking across half the roof could add days to the project. Getting a clear scope of work before signing the solar contract prevents surprises.
Working With Qualified Contractors
Roof assessments and solar installations involve two distinct skill sets, and not every company handles both well. The best outcomes come from coordinating a licensed roofer and a certified solar installer, or from hiring a firm that employs both trades in-house. This coordination ensures that any roof repairs are completed to standard before panels arrive and that the solar mounting does not void your roofing warranty.
When vetting contractors, ask for proof of licensing, insurance, and manufacturer certifications. Request references from projects similar to yours, especially ones where roof work and solar were combined. A platform like USremodel can connect homeowners with independent contractors across multiple trades, which simplifies the process of finding qualified professionals for both the roofing and solar portions of the project.
Also confirm who is responsible for what. If the roofer repairs the roof and the solar installer later causes a leak at a mounting point, you need to know which warranty applies. Clear, written responsibilities prevent finger-pointing and make it easier to get problems resolved quickly.
Preparing Your Roof for a Smooth Installation
Once your roof passes inspection, a few simple steps help the installation go smoothly. Clear the area around the house so crews have access, trim overhanging branches that could scratch panels or drop debris, and remove loose items from the attic if the crew needs to inspect framing. If your roof has not been cleaned in years, a gentle wash can reveal problem areas before the assessment.
Schedule the assessment during dry weather when possible, since rain can mask or exaggerate certain conditions. Ask the inspector to photograph any areas of concern so you have a visual record. And keep all documentation, including the inspection report, repair receipts, and warranty paperwork, in one place for future reference.
Finally, think about the long term. Solar is a 25-year commitment, and your roof is the foundation of that investment. Treating the roof assessment as a serious step, not a formality, is the surest way to protect both your energy savings and the integrity of your home.